Hack a Sat - Phasors to Stun
 Written by
Lucas Teske
Written by
Lucas Teske
on
Hack a sat — Phasors to Stun
The challenge
I got really excited about it because it’s a SDR one. And everyone that knows me know that I love SDR stuff.
The zip file itself contains a wav file which they told us is not an audio but an radio signal
 File command to show what the wave file is
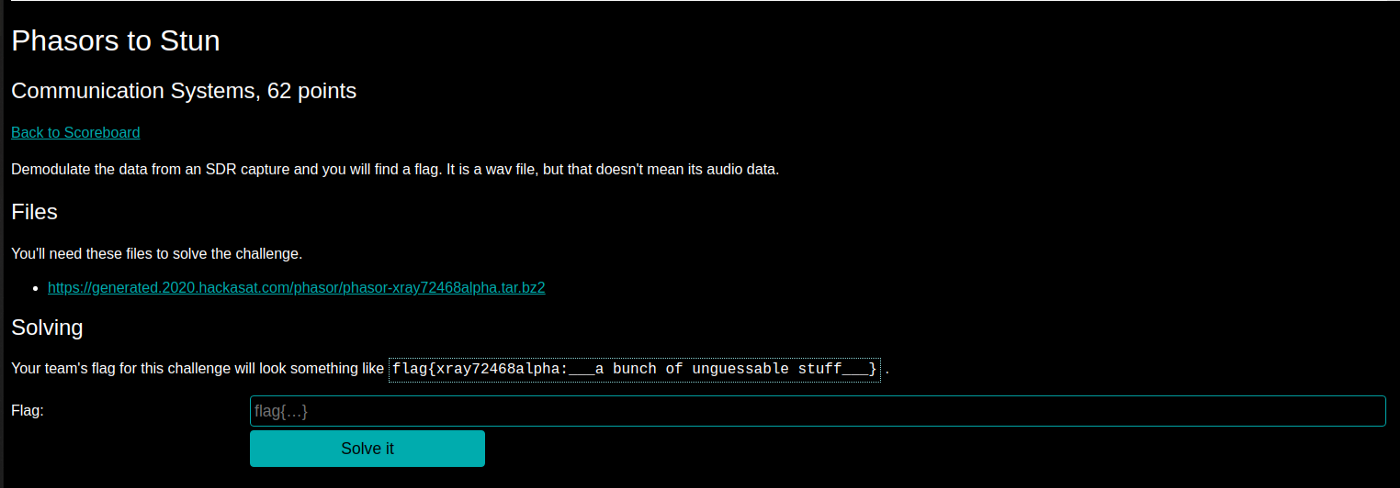
If we open in audacity we will see a very interesting pattern:
 Audacity view of the wave file
That looks like a 2-FSK demodulated file (see https://en.wikipedia.org/wiki/Frequency-shift_keying). When you demodulate a 2-FSK I/Q from correctly from a Radio, it will convert the frequency to voltage leading to a pattern like the one saw.
I said 2-FSK besides other ones, because there is clearly almost only three values there: 1, 0 and -1. The 0 is usually the transistion, and in a 2-FSK 1 and -1 represents the bits itself. We can use GNU Radio to transform that in a bitstream, but before we need to know the baud rate (or bit rate).
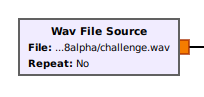
That can be done manually in the audacity itself. Just find two peaks that are closer to each other than other any other. That’s probably the minimum period of the signal which usually tells us a bit change. For example:
 Two short peaks selected
I got one negative and one positive short peak, which would represent a 0 to 1 transition or a 1 to 0 transition. Then you can see that there is 4 samples selected (just check these dots, they’re the samples in the file) which means that there is 4 samples per bit in the wav signal. Since the wav sample rate is 32000 we can expect the baudrate to be something close to 8000. So now we have enough information then we can go to GNU Radio!
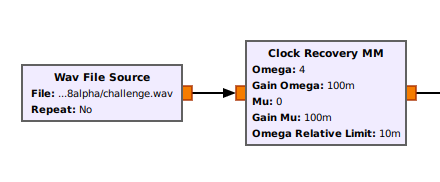
In GNU Radio the first thing we should do is get a Wav File Source to open the file:
 Wave File Source
I selected the option Repeat to be false, so it will not run forever repeating the file. After that we need something to synchronize our bits and find where to sample the bits we want. There are several blocks that can do that, but I usually prefer the M&M Clock Recovery block. Its easy to use and since the signal does not have much noise on it, it will work perfectly. One thing to notice is that the M&M usually works on complex samples, so you need to change the sample type to float. Then there is a few parameters to set:
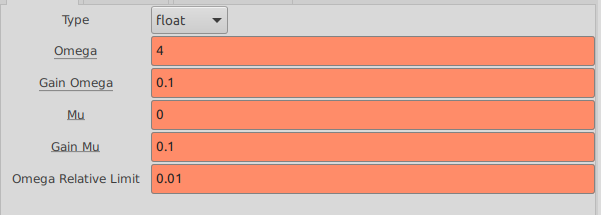 M&M Clock Recovery Parameters
The most important here is Omega. Omega represents the number of input samples per output sample (let’s call symbol). We found out that the input audio has 4 samples per symbol. So our Omega is 4. The other parameters defines how the tracking loop works. You can start with the parameters I put (is usually the defaults what I try initially) and tune afterwards. They’re mostly effective for signals that are degraded by noise which is not the case of this flag. That means basically any value should work.
One thing worth to mention is that the Omega Relative Limit limits how much from the “last detected symbol” the current symbol can deviate. If you put higher enough, the lock will be loose and can detect wrong symbols. Since our signal basically doesn’t have any noise, we can put this value very low.
Now we can plug the two blocks:
 Clock Recovery + Wav File
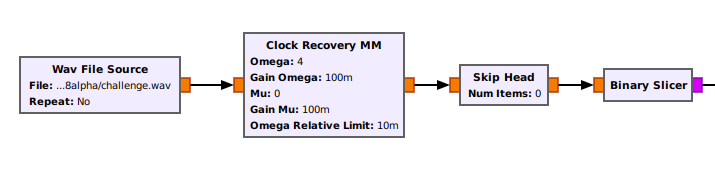
The next step is to use a Binary Slicer blocks that will convert a -1 in float to a 0 byte and a 1 float to 1 byte. But before that we need to talk about bit alignment and how it affects us.
Let’s supose we have this string:
HELLO
That in binary is:
01001000 01000101 01001100 01001100 01001111
   H         E        L        L       O
If we have a stream that repeats hello two times we will have something like that:
01001000 01000101 01001100 01001100 01001111 01001000 01000101 ...
   H         E        L        L       O        H        E
When receiving continuous signals, you usually don’t know where you started fetching the data. Its possible that we started at middle of a byte instead of the start. That affects us because if we start counting a byte from the middle, we will have bytes that have pieces of to bytes. For example if we started at bit 4:
1000010001010100110001001100010011110100100001000101
We will be missing 4 bits from the first byte and we would not know that. And if we tried to decode it:
10000100 01010100 11000100 11000100 11110100 10000100 0101 ...
   �         T        �       �        �         �
The signal wouldn’t make sense to us. So we need to account that we might have a bit shift in that. Since our chars are 1 byte wide (8 bits) we only need to check from shift 0 to 7, since if it is bigger than that, it will be the same as N byte shift + n bit shift.
On gnuradio we can use a Skip Head block that will skip N samples before sending the data to the next block.
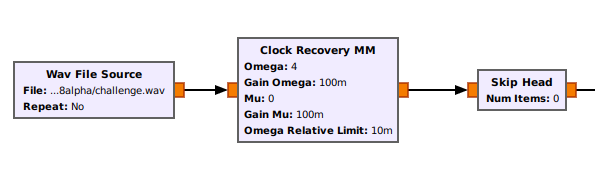 Wav + MM + Skip
We can start with Num Items = 0 because we don’t know if the data has been shifted. Then we can get to the next block that is the binary slicer.
 Wav + MM + Skip + Slicer
The binary slicer work is simple: It receive float samples. If the sample is > 0 it outputs a byte with value 1. If its ≤ 0 it outputs a byte 0.
After that we will have a stream of bits unpacked in a stream of bytes. We need to pack them together (each 8 bytes of input to form a single byte). For that we can use the Pack K Bits block.
 Wav + MM + Skip + Slicer + Pack
The Pack K Bits block will fetch K input bytes, put them together and output a single byte. It is basically a Add + Shift process that after it processes K inputs, it outputs the memory and resets. It will basically transform:
00000001 00000000 00000001 00000001 00000001 00000000 00000001 00000001
And make a single byte:
10111011
After that we can save it to a file using the File Sink block.
 Complete decode flow
I selected it to Overwrite the output file, so when we change the Skip Head, it just replaces the old file.
Now we have our complete decode flow, we can hit run in the bar.
After that we can inspect our file by running cat on it.
cat output.bin
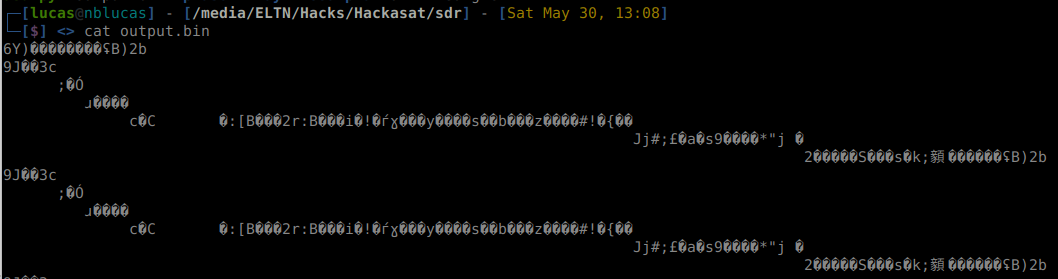 cat output
We can see that something is periodic, but it doesnt make sense. So we repeat the process increasing Num Items. And then with Num Items = 5
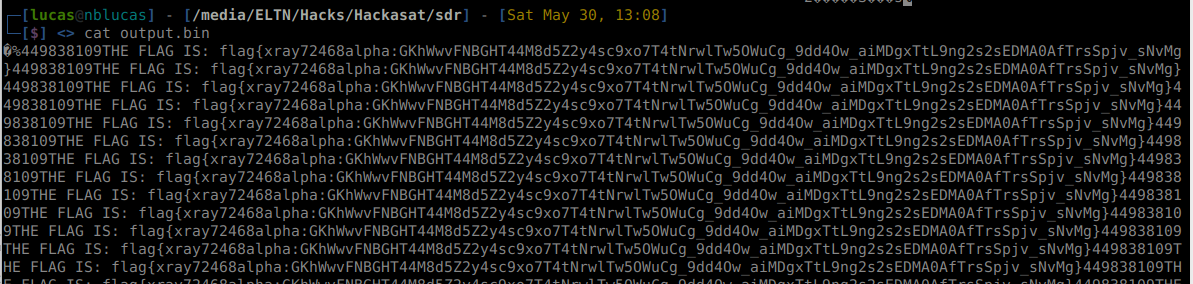 FLAG FOUND
We’ve found the flag!
THE FLAG IS: flag{xray72468alpha:GKhWwvFNBGHT44M8d5Z2y4sc9xo7T4tNrwlTw5OWuCg_9dd4Ow_aiMDgxTtL9ng2s2sEDMA0AfTrsSpjv_sNvMg}
Final flow:
 Final GNU Radio Flow