Recording NOAA APT Signals with GQRX and RTL-SDR on Linux
 Written by
Lucas Teske
Written by
Lucas Teske
on
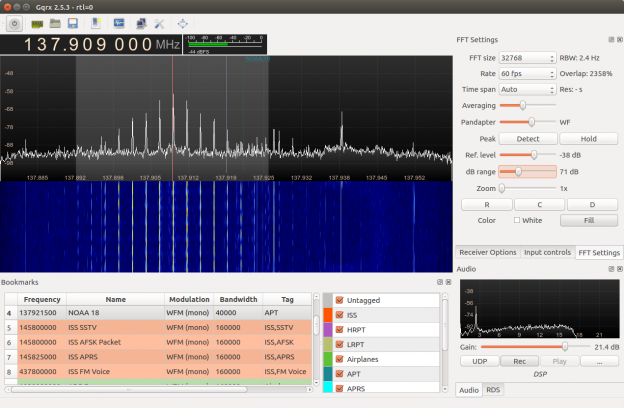
GQRX NOAA 18 Signal
So you all saw my last posts [ Play with SDR and Intel Edison! QFH Antenna and my first reception of NOAA! ] but I actually didn’t explained how to capture and decode APT Signals using your computer (in this case, with Linux). So here it is! For this article I’m using Ubuntu 15.04, but actually any distro will work well (I think most of them have the needed packages)
So the first thing you need to do is to get all needed hardware to start playing. I’ve already tested my i7 Skylake Laptop, a Intel Edison and LeMaker Guitar for these uses. For my Laptop and LeMaker guitar you can use only them to do the stuff, because they both have graphical interface for the GQRX. For the Intel Edison all you can do is open a rtl_tcp spectrum server as my sdr edison article explains, and receive the spectrum in any other machine (including LeMaker Guitar).
Hardware Needed
So for the hardware you will need:
So after you get all your hardware, and assemble it ( my QFH Antenna Article have some details about it ). It is basically plug your RTL-SDR Dongle at USB Port and attach to your Antenna. The original antenna “works” [ You can hear the signal, but not receive images ], but I suggest to build a proper antenna.
Installing the softwares
So I will use Ubuntu 15.04 as an example here for receiving signals. The instructions for any Debian based distribution should be exact the same. For RedHat based, use yum instead of apt-get. You can also use your favorite package manager inside your distribution.
The packages that we will need are:
- librtlsdr0
- gqrx-sdr
- gpredict
- Audacity
- atp-dec or APT3000 (web) or OpenSatelliteProject or WXtoIMG (not opensource)
Most distributions include in their repositories the librtlsdr, some include gqrx (for ubuntu you can get the upstream from their website), and atp-dec none of them include (sadly, because it is a very nice application). You can also use for decoding APT Signals the APT3000 webpage and my project OpenSatelliteProject. GPredict should also be included in most major distributions.
Tracking a Satellite with GPredict
So the first thing we need to do is track our Satellites. The only three APT active Satellites are NOAA 15, 18 and 19.
So open GPredict and go to menu Edit => Update TLEs => From Network to update GPredict internal database of TLEs. You can also obtain the TLEs on https://www.space-track.org . NASA keeps all TLEs up-to-date at space-track. You should Update your TLEs at least once per month.
After that, lets configure the satellites we want to visualize by clicking on the arrow ![]() and go to Configure.
and go to Configure.
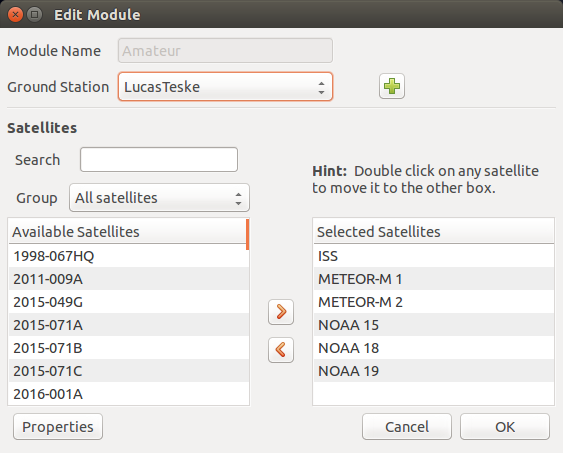
Select Satellites to Track on GPredict
So you can search for NOAA and add the 15, 18 and 19 satellites to the tracking list. I also added ISS (International Space Station) and METEOR-M satellites (I wanted to try to capture LRPT Signals as well, but no success so far). Also click at the + button to add a new GroundStation. Create any name you want ( I will name MyGroundStation ) and pick up a location (or if you know your coordinates, fill with it). After that, hit OK button. You should return to the main screen with all satellites on it.
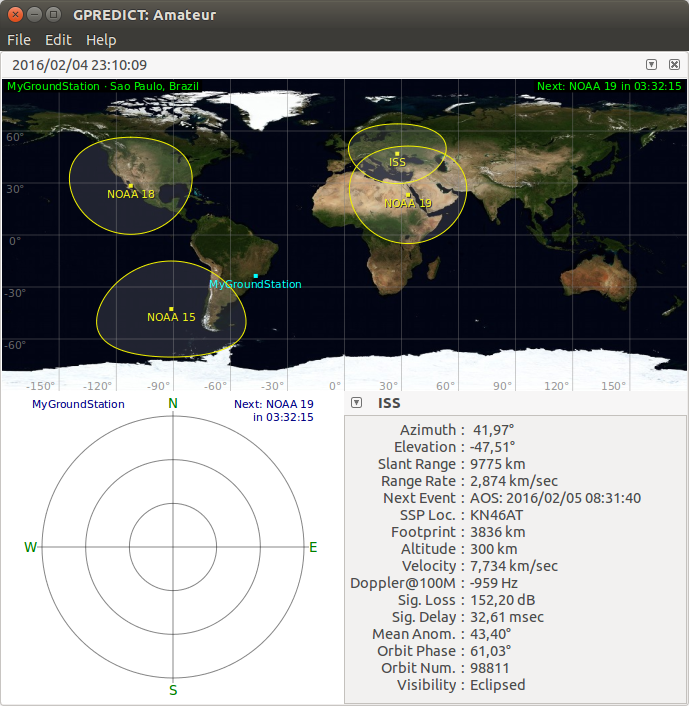
So now you can track all the satellites! So let me give you a few hints about this software:
- At the radar view you can see on the top-right the indication of which satellite and how much time it will take to be visible. That doesn’t mean also if it will be capturable (usually if you don’t have a good antenna, you cannot receive the image in the edges of the horizon), but it will give you a prediction of the next satellite. Also you can check where the satellite is at the radar view.
- In the map-view the yellow circle around the satellite is the horizon, or in another words: the range of the satellite. So if you are on edge of this circle, it means the satellite will look that is on the horizon for you.
- You can right-click at the Satellite name on map to show a Ground Track (where the satellite will pass), show Next Pass to show the next time after the radar time the satellite will pass and show Future Passes that will predict where the satellite will pass in next days.
So now, you just need to program yourself to be available when a satellite passes over your ground station. The satellites have a orbit around 1h30, but that doesn’t mean their orbit position are the same everytime it passes. As I observed, these NOAA satellites usually passes on the _same location _once per week. So just have attention when it will pass over your station. Before moving to the next step, please have at least 10 minutes on the clock before the satellite passes.
Capturing the Satellite Signal
So now open GQRX to start the look up / capture of the Signal. After you open, it will probably ask you to configure the GQRX. If not, click at the ![]() to open the configuration.
to open the configuration.
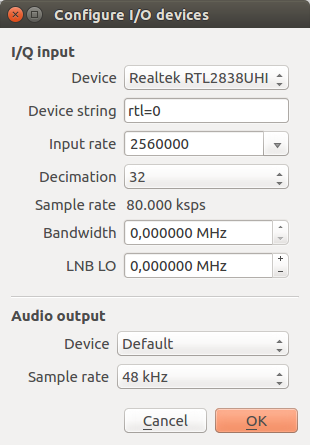
Configuration of GQRX
Since the total bandwidth we need is about 40kHz, we can super-sample and decimate to increase the ADC resolution. So with a 32x decimation, we should increase 2.5 Bits ( log 32 in base 4 ) in the ADC Resolution. It also filters some of the noise because of the low pass filter to decimate. This gives us a better SNR at the output.
If you noticed the RTL-SDR goes up to 3.2Msps of Sample Rate but above 2.56Msps the Realtek IC starts loosing bytes. So you can get 3.2Msps, but not continuous. Because of that I use 2.56Msps since it is the highest rate you can get without samples being drop.
After that, click OK and the GQRX should open.
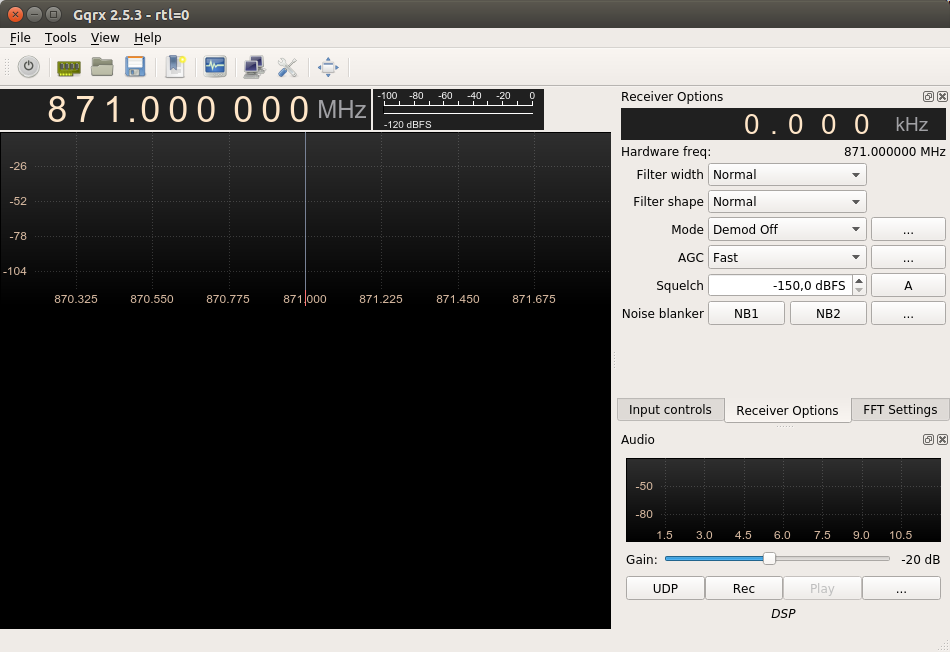
Start screen of GQRX
So now lets first setup the Audio Output Folder by clicking on the … button at the Audio Panel. Just make sure to select a folder, because once here I ran GQRX, clicked Rec and recorded everything. After recording I noticed that the folder field was empty, and my file went to limbo.
Now we have the basic configuration of the GQRX done. So now lets setup the demodulator. In the Receiver Options configure:
- Filter Width => Wide
- Filter Shape => Sharp or Normal
- Mode => WFM (mono)
- Frequency Bar => 0.000 kHz
In FFT Settings setup:
- Ref Level => 0dB
- dB Range => 104dB
- Peak Detect => Clicked
In Input Controls setup:
- Hardware AGC => OFF
- Swap I/Q => OFF
- No Limits => OFF
- DC Remove => ON
- IQ Balance => ON
- LNA Gain => 20dB
In ![]() set your satellite Frequency:
set your satellite Frequency:
- NOAA 15 => 137.620 MHz
- NOAA 18 => 137.9125 MHz
- NOAA 19 => 137.1 MHz
Now we can start the SDR Spectrum Capture by clicking at ![]()
Adjusting the capture
So there are few adjustments to be done. First of them is the Center Frequency. These cheap RTL-SDRs tend to drift a few 10’s of kHZ from the actual frequency, so you might have to change the frequency a bit find the signal. So if your antenna is good, you should see the signal as soon as the satellite come in range. You should also play a bit with the LNA Gain setting to see where it gives you the bigger diference between the satellite signal and the floor noise (the bottom line in the spectrum). Here is a sample of how the signal looks:
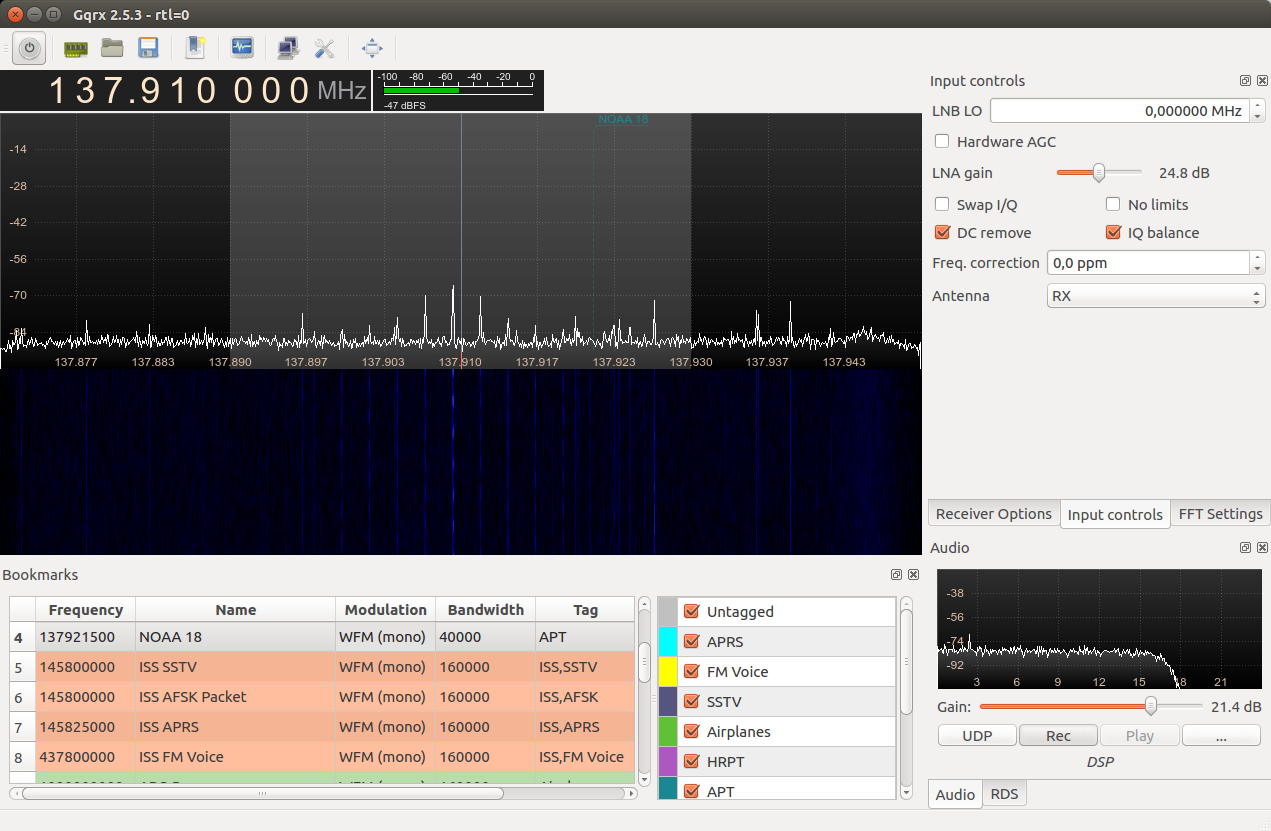
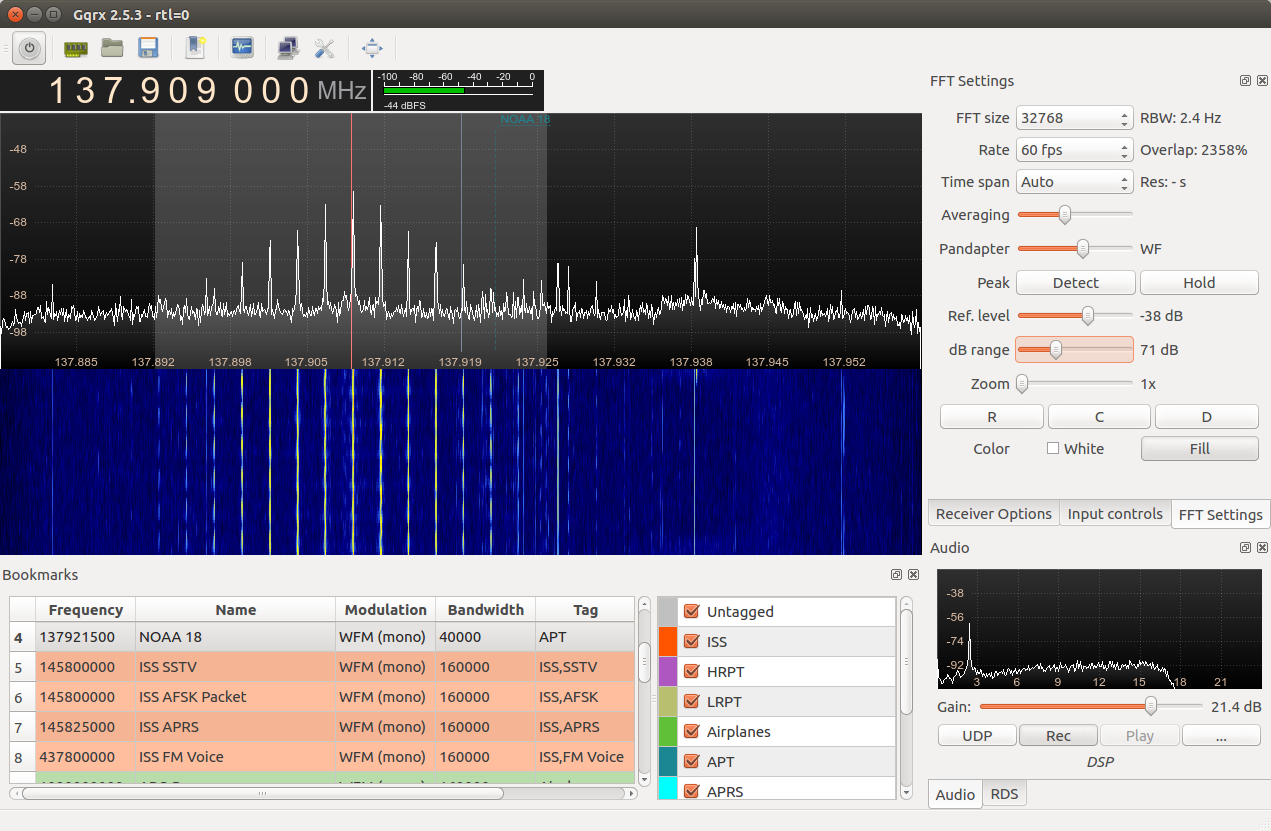
Low signal when the satellite is in the edge of the horizon.
So as soon you find the signal, hit the Rec button to start recording the audio, and play with the values to get the less noise as possible. Also push the grey block over the signal to be around 40kHz (you can check in the Receiver Options screen at Filter Width). After getting everything setup, sit down and relax while the satellite passes. Notice that as the signal increases, the APT signal audio starts to be more recognizable from the noise. Here after a few seconds that the satellite come in range, I get a nice and clear audio from the APT Signal.
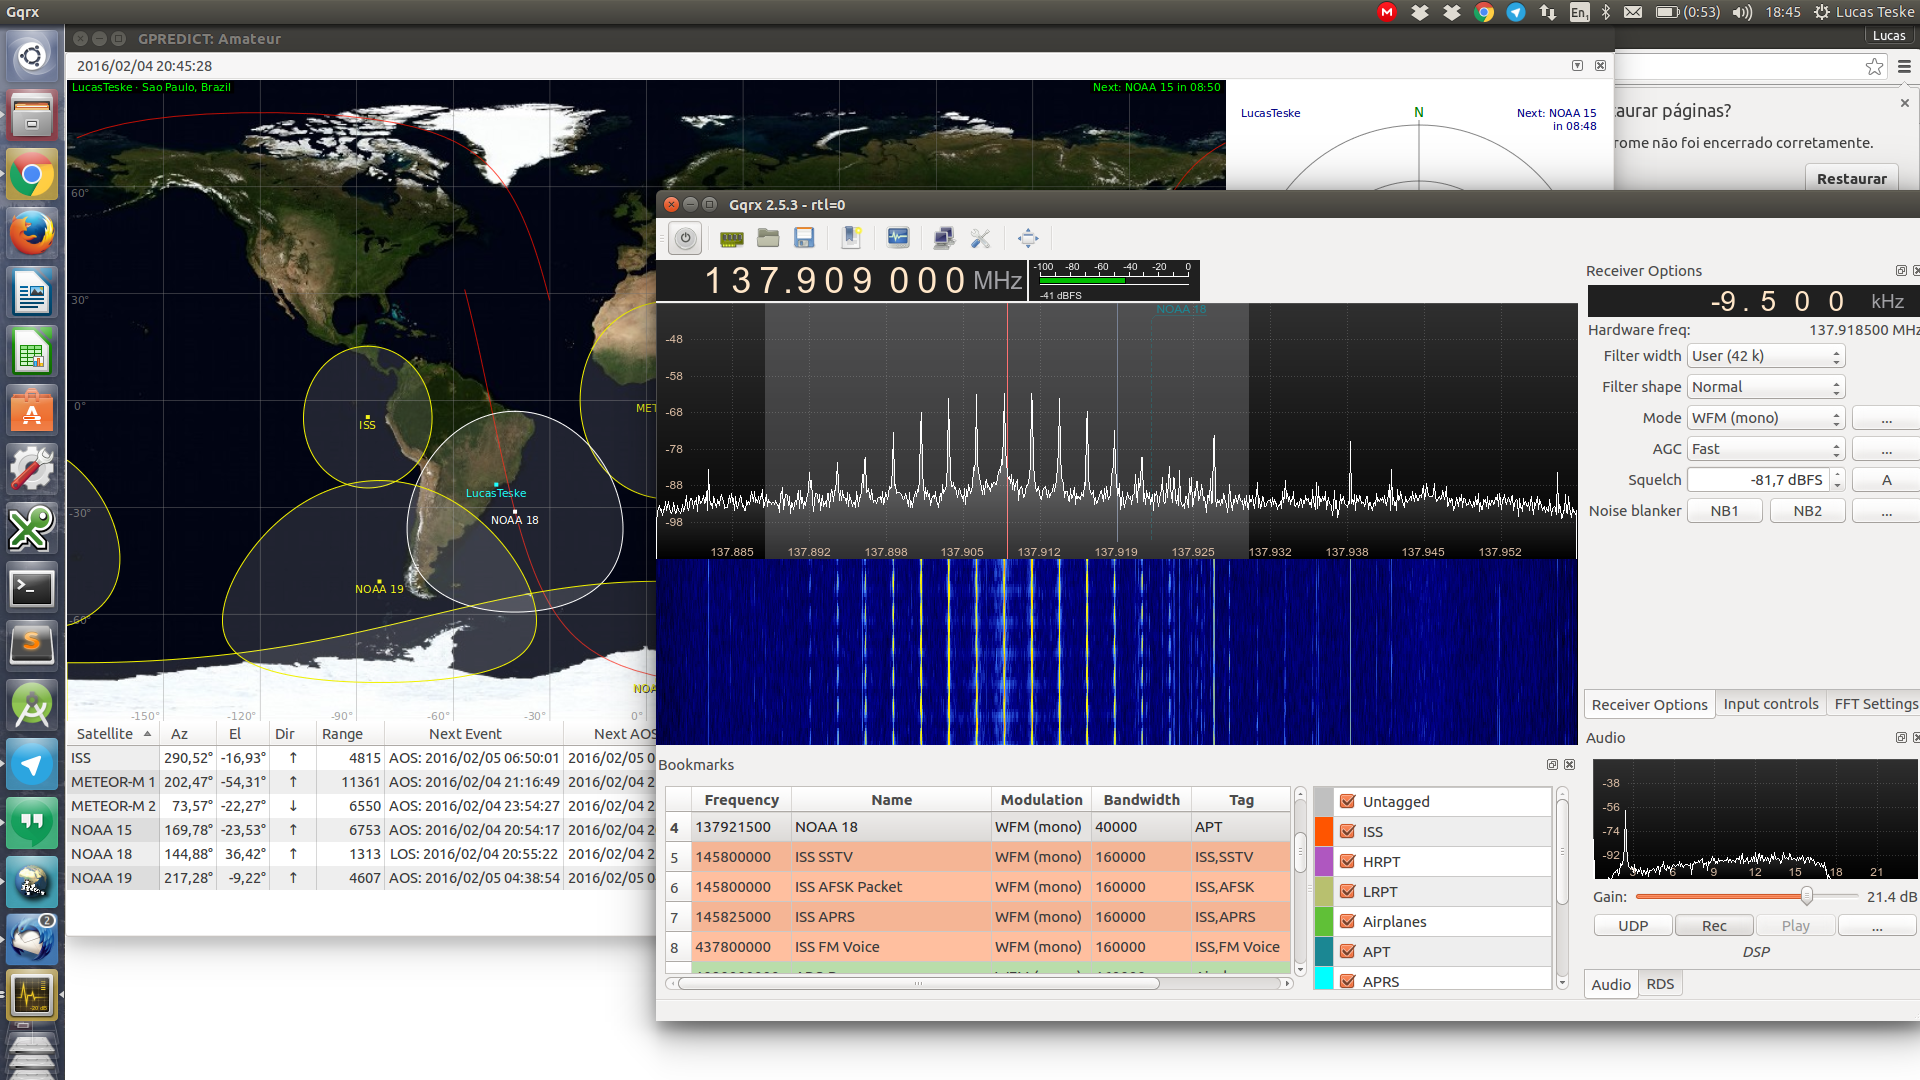
GQRX NOAA Record in Progress
You might want to adjust the gray block to have the red line centered on the center spike. The signal will drift to the left because of Doppler Effect. This is usually not needed if you have a wide enough gray block (filter), because most APT Decoding softwares compensate for doppler effect using APT Sync Signal.
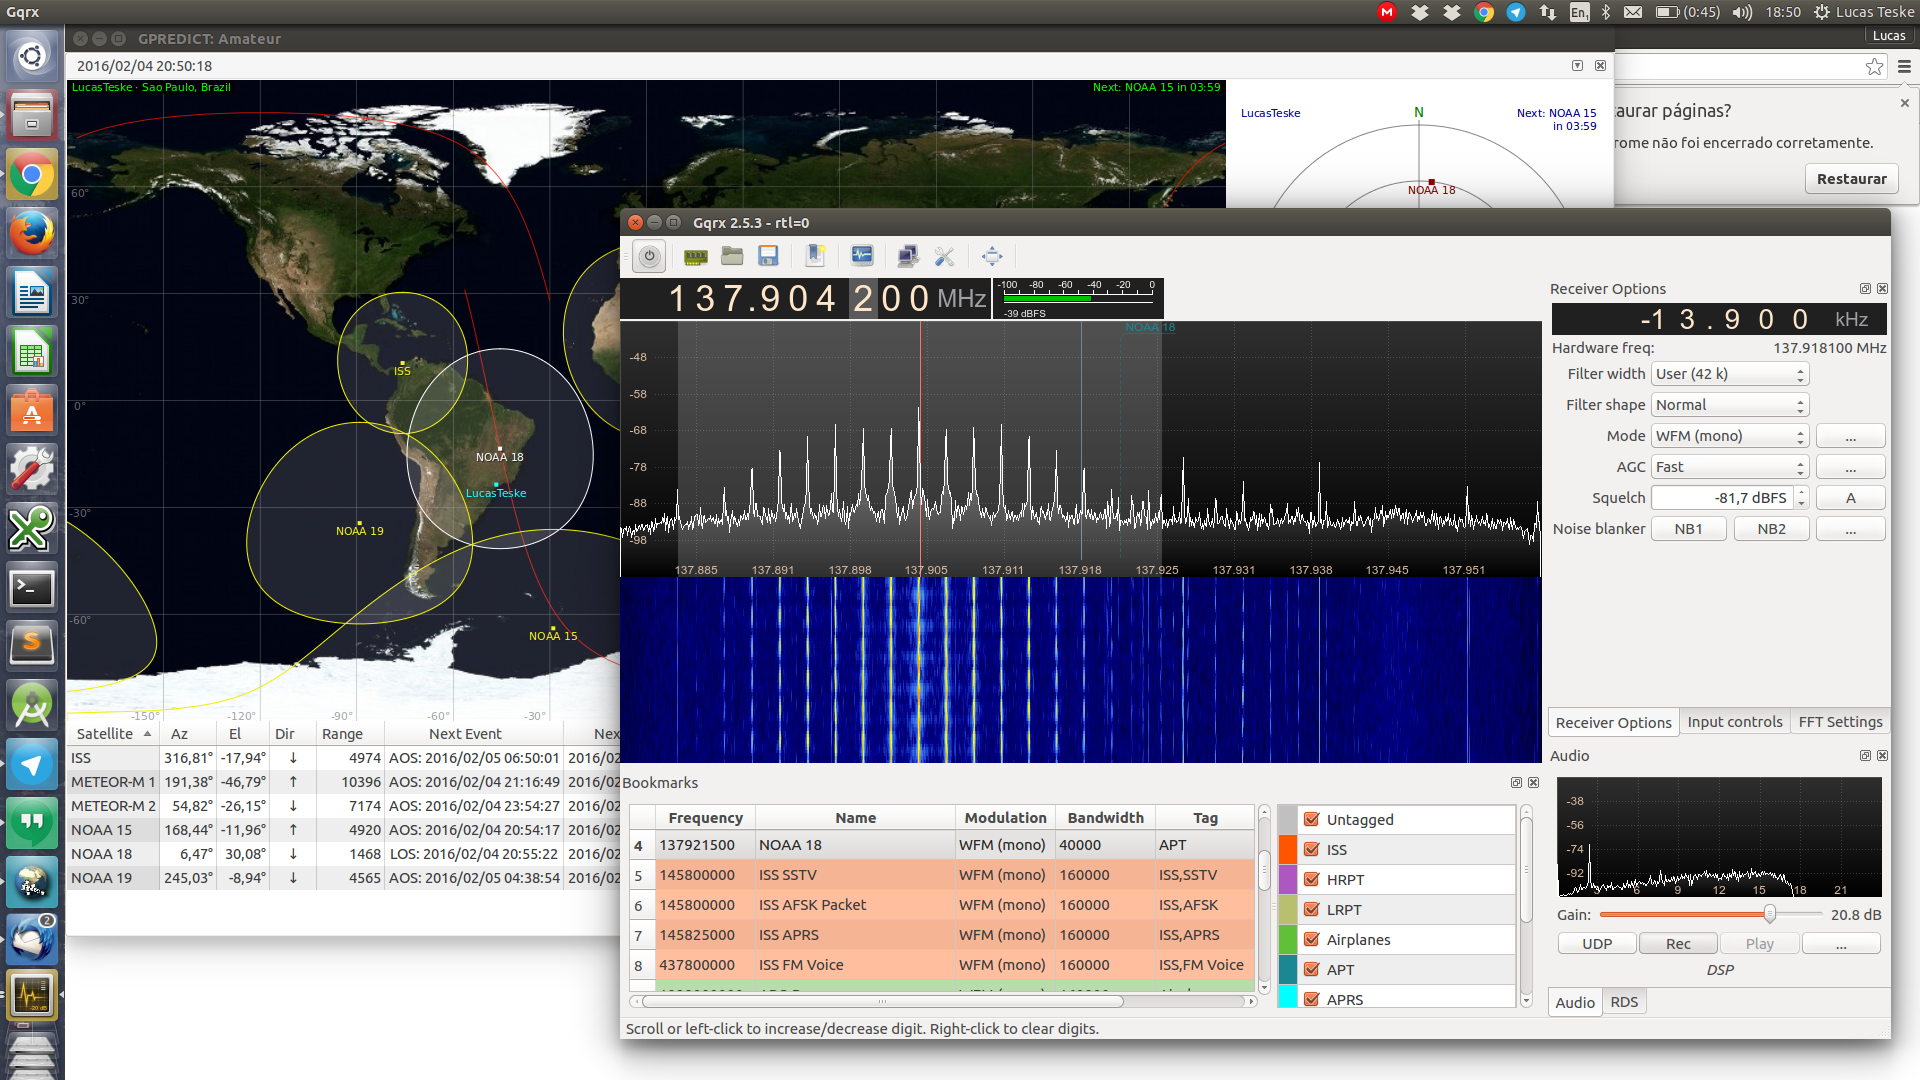
I started Recording at 137.909MHz and it drift almost to 137.904MHz.
After the satellite gets out of range (or the signal is too noisy), click the Rec button again to stop recording. The output audio file should be on your target folder.
Processing the Audio File
Now the first thing is to normalize and resample the wav file. All the current APT Decoding softwares expect a Mono 11025 Hz WAV File, but the recorded wav is stereo and in 48kHz. So we will use Audacity to do all of these. So open your wav file in audacity.
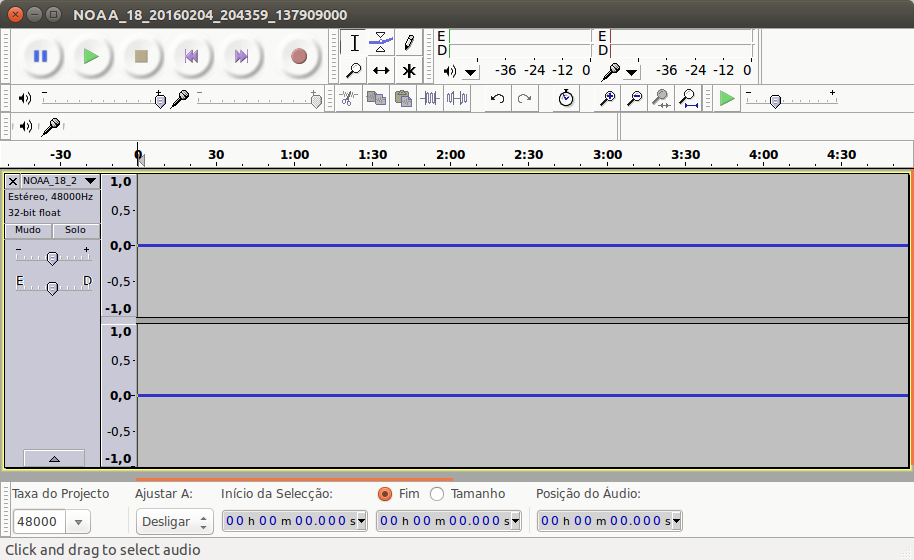
Audacity with the Wav File
With the file opened, first squash the two channels into one by going to the menu Tracks => Stereo Track to Mono. This should remove the second track and set the audio to mono.
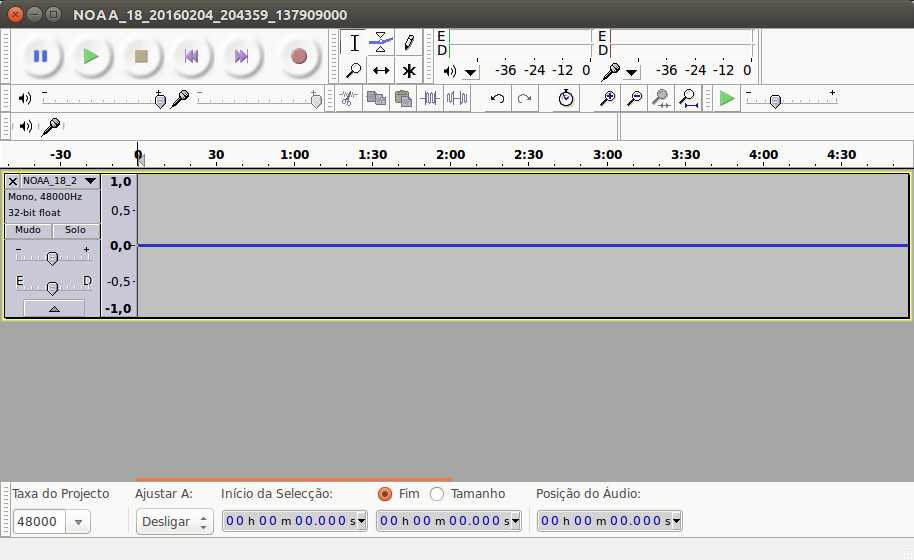
Mono Track
Now we need to normalize it because our signal is too low. To do so, go to Effects => Normalize. Keep the defaults settings and hit OK. You should have a much bigger signal.
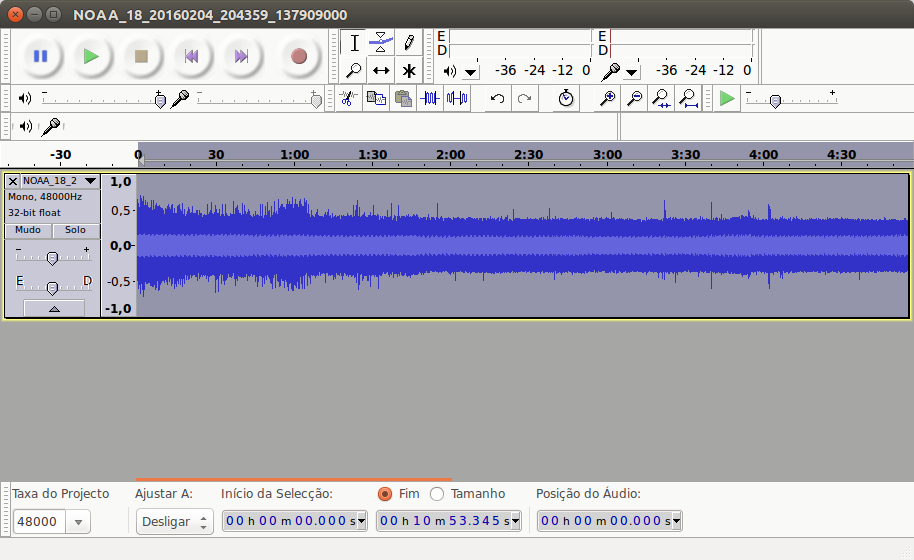
Normalized Signal in Audacity
Now in the bottom of the screen, change the Project Rate to 11025 and then go to Tracks => Change Sampling Rate. The new sampling rate should be 11025 already, so just hit OK. You will see that the signal will change and attenuate a bit.
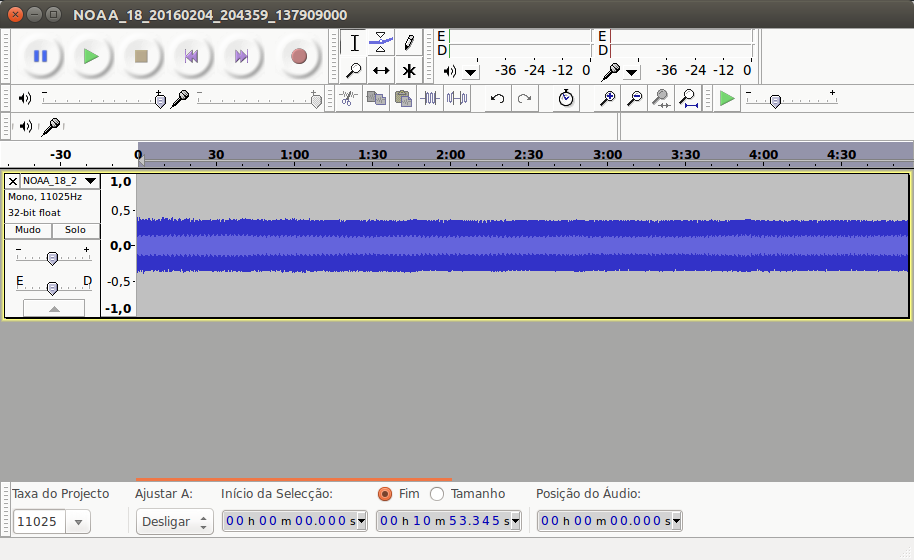
Resampled Signal. Some noise disappeared.
Now you can hit normalize again just to make sure that the signal is normalized.

Normalized Signal Resampled
Now you can go File => Export Audio and make sure you export a 16 Bit PCM with Signal Microsoft WAV File. I usually keep my original file, and name this processed one as myoriginalfilename_11025.wav. Now we are ready to decode.
Decoding using APT 3000
The easiest way now is to decode using APT 3000 webpage. It doesn’t produce great results always, but it it very good if you have a good signal. So just go to http://jthatch.com/APT3000/APT3000.html and browse your recently edited file. It should take some time and then decode the image. Click View AB to see the full image.
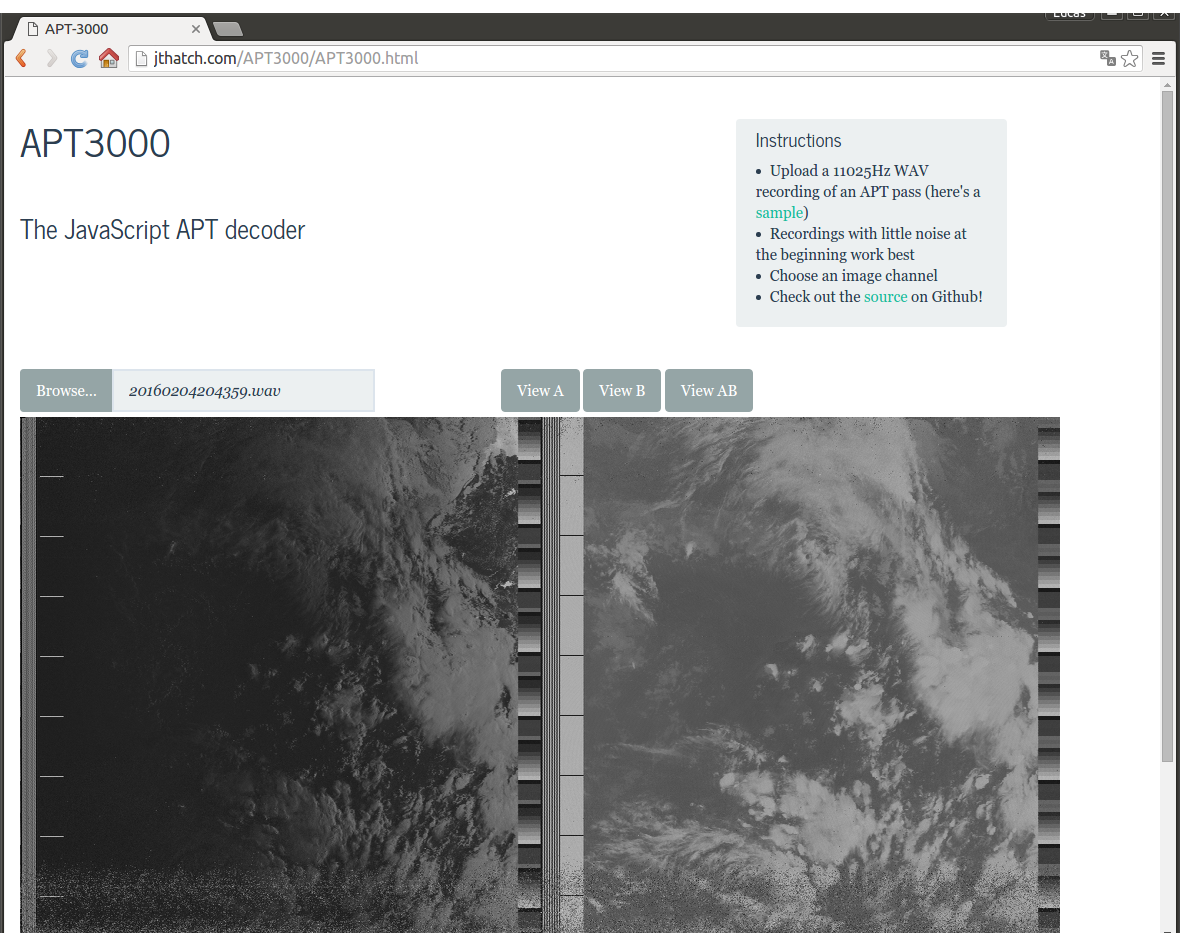
APT 3000 Decoded Image
Congratulations! You got your first weather satellite recording! YEY!